NYU VPN Installation
Installing the NYU VPN client grants access to certain resources while using a computer from off campus such as:
- Network drives (F drive, H drive)
- Certain Library Databases
- myTime
- Pharos printing while off campus
To install the VPN client on a Microsoft Windows based PC, follow these steps
- Click here to navigate to NYU’s Windows VPN installation page. The link to download the client is in the first step on that page.
- Once the setup file is downloaded, navigate to the folder it was saved to and open the file. This is a zip file, so you might need to open it twice for the setup program to launch.
- Start the setup process:

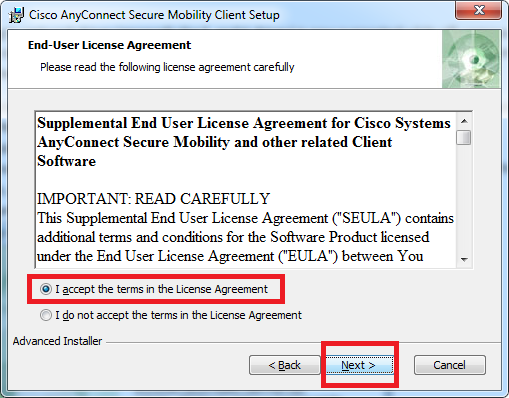
- Click Next to get to the License Agreement page. Accept the license agreement and click Next again.
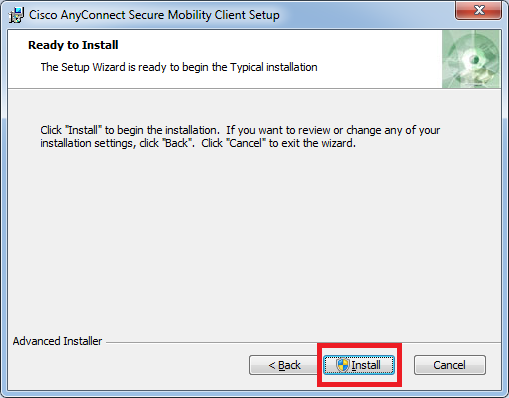
- Click Install.
- Once the installation process has completed, click Finish to exit the install program.
- Launch the VPN client by opening your Start Menu --> All Programs --> Cisco --> Cisco AnyConnect Secure Mobility Client

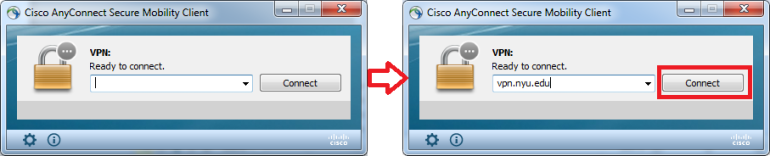
- Once the Cisco AnyConnect VPN client is launched, a small window will appear in the lower portion of your screen. In this window, type vpn.nyu.edu and click Connect.
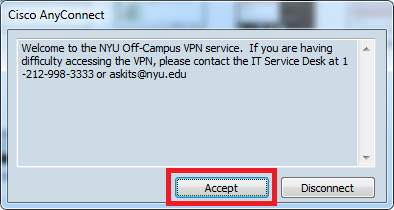
- If the connection is successful, the Welcome Message should appear, at this screen, click Accept to complete the connection process.
- Confirm that the VPN connection is active by finding the Cisco icon in your computer’s taskbar (usually at the bottom-right of your screen, next to the time).
Notes
- You will only need to enter in the server information (vpn.nyu.edu) once.
- If the connection fails, try navigating to http://home.nyu.edu and logging in. If you cannot login, go to http://start.nyu.edu to reset your password.
Known Issues
Some Windows 8.1 users may receive an error message when trying to connect to NYU VPN, similar to "Failed to initialize connection subsystem." NYU ITS ServiceLink knowledgebase article KB0013024 provides a work-around.