Law E-mail
Outlook 2016/365 Setup (PC Only)
- Close Outlook (if open)
- Open Start Menu, type in "Control Panel", open Control Panel, open Mail (32-bit)
- Click "Add" to create a new profile
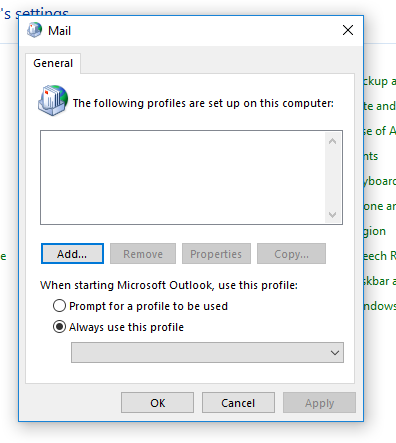
- Name your profile, hit OK
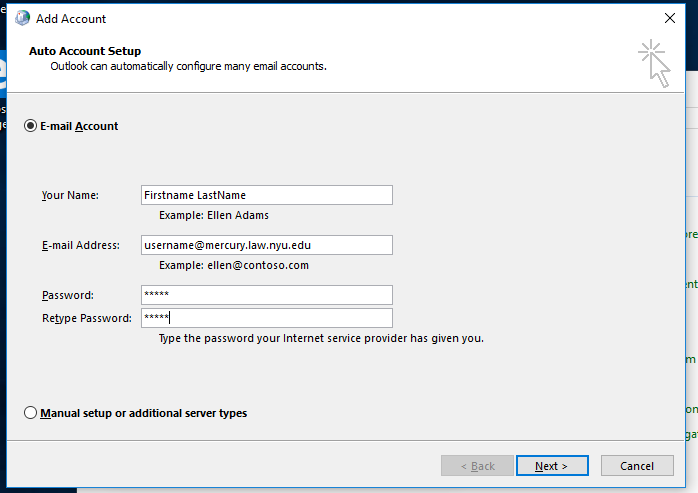
- Fill in required account information. The email address format is your law school computer username (e.g. johnsonk, smithj, etc.) followed by @mercury.law.nyu.edu (see screenshot, below), hit next
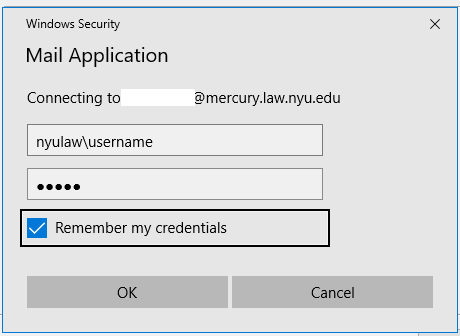
- A prompt for you to enter in your account credentials will appear. Make sure that your username is entered in as prefixed with NYULAW\ as shown in the image, below.
- If your credentials were accurate, you will be shown the confirmation page.

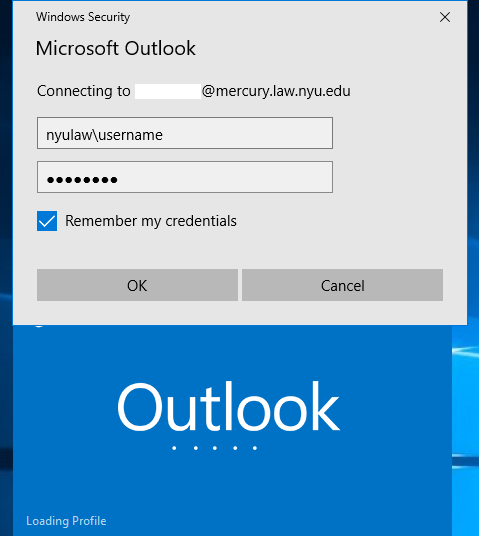
- Launch Outlook, you will likely be prompted for your credentials one more time. Again, please be sure to use the proper format for your user name: NYULAW\username
- Outlook should launch
Outlook 2013, and older (PC Only)
Before creating your new Mercury profile, remove your previous Exchange profile. If you have multiple accounts, you must go through this process for each profile.
- Go to your Start Menu > Control Panel > Mail (32-bit)
- Click “Show Profiles” > Select the profile you are deleting and click on “Remove” > Confirm your action
- Create your new profile by clicking on the “Add” button
- Enter your user name in “Profile Name:” field and click OK
- Select the option to manually configure your settings and click Next
- Select “Microsoft Exchange Server or compatible service” and click Next
- Enter: mercury.law.nyu.edu in “Server:” field
- Add your User Name (e.g. johnsonk) and click “More Settings…”
- Under “Connection” tab, check “Connect to Microsoft Exchange using HTTP” then click on “Exchange Proxy Settings…”
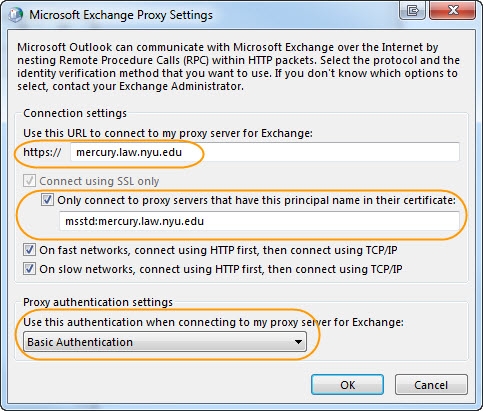
- Set the following settings:
- In https:// field enter mercury.law.nyu.edu
- Check “Connect using SSL only” and “Only connect to proxy server that have this principal name in their certificate”
- Enter: msstd:mercury.law.nyu.edu
- Check both network speeds checkboxes
- Set Basic Authentication in drop-down list under “Use this authentication when connecting to my proxy for Exchange:”
- Click on OK > Apply > If you have multiple profiles, select the response you would prefer for “When starting Microsoft Outlook, use this profile:” > OK > Check Name
- A login window will pop up. Make sure to add the prefix in the username field as below.
- Username: NYULAW\username
- Password: The same password you use to log into your computer.
- Click OK > Next > Finish
Smartphones
iPhone Exchange Account Setup
- Go to Settings > “Accounts & Passwords”
- Add Account and select Microsoft Exchange.
- Under E-mail: youraddress@mercury.law.nyu.edu
- Password: your exchange password
- Description: Whatever you want your iPhone to call this e-mail.
- On the next screen, fill out the following:
- Server: mercury.law.nyu.edu
- Domain: nyulaw
- Username: you username without the @mercury.law.nyu.edu
- Press next to set up your e-mail.
Android Exchange Account Setup
- Open your App Drawer/Applications Menu and select “Settings”
- Navigate to and select “Accounts and Sync”
- Select “Add Account,” then select “Microsoft Exchange Activesync” (or a similar variation) or “Corporate” from the list
- Select “Manual Setup,” then “Exchange”
- Enter the following info:
- Domain\Username: nyulaw\(your law school username) ; e.g. nyulaw\SmithJ
Ensure that you are using the backslash “\” and not forward-slash “/” - Password: (your password)
- Server: mercury.law.nyu.edu
- Domain\Username: nyulaw\(your law school username) ; e.g. nyulaw\SmithJ
- Select next. On the following screen, you may change sync options from the defaults if you wish.
- Select next again. On the following screen you can choose to give your account a nickname on your device, or leave it at the default name. Press “next” and the account will be set up and ready. It may initially take a few minutes to synchronize and download e-mail.